Gyeon Q2 Pure: Product Review and Application Guide
While my M3 has been coated with Ceramic Pro for several months now, I always enjoy trying new products and seeing what the latest offerings can do. Gyeon Q2 Pure is a new coating in Gyeon’s 2018 lineup, replacing Q2 Prime. It is positioned to be their first level of the “Professional” line of coatings, with Syncro being the top of the pro series. Gyeon does an excellent job of marketing their coatings appropriately and ensuring that the right people are going to be buying the right products. Recently, I had the opportunity to coat a friends M240i with this coating, as well as apply it to my trunk and diffuser for the purpose of comparing it to my Ceramic Pro coating.
First, a quick note about what Pure is. Pure is a Si02 (Silica Dioxide) based coating meant to provide chemical resistance, a glossy finish, and excellent self-cleaning abilities, all while remaining fairly easy to install. Pure is made to be installed in a single, thick layer, making it incredibly convenient for mobile detailers and high-end DIYers alike. Gyeon advertises it as lasting 18 months or 15,000 miles, which will prove impressive if it holds up that long with regular maintenance.
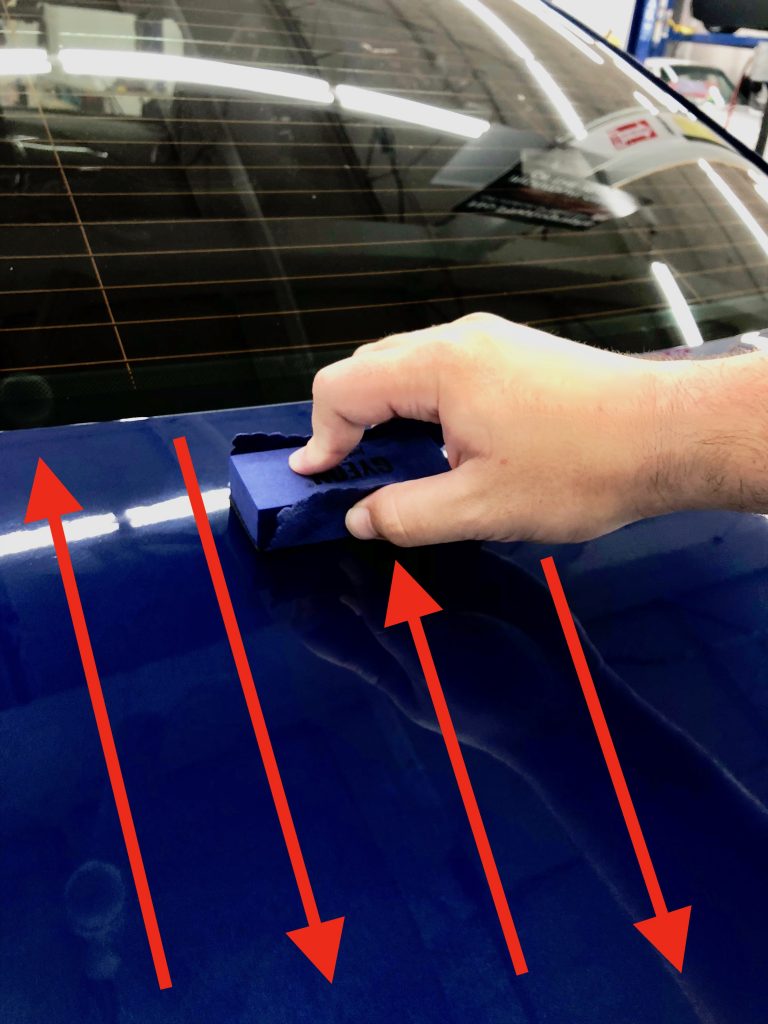 Showing the motion you should be making when applying. Up and down OR left and right, but not both. We can just pretend I was wearing gloves in this photo. I was being admittedly lazy since I was only coating my trunk and not the whole car.
Next, you’ll want to wait a few seconds and then begin your wipe off. The time to wait can vary based on your humidity, the higher the humidity, the faster you’ll want to begin wiping. It's worth noting that the bond between the coating and your paint takes place in the first 3-5 seconds, after that, it's all about picking a time that makes the leftover solvent carriers easy to remove. Too little time and it’ll be wet and will streak easily, too much time and it will become tacky and hard to buff. I found that waiting about 5 seconds produced great results for me in slightly above 60% humidity. I also recommend using a hile pile microfiber, as it absorbs the solvents very well and left me with no streaking.
Showing the motion you should be making when applying. Up and down OR left and right, but not both. We can just pretend I was wearing gloves in this photo. I was being admittedly lazy since I was only coating my trunk and not the whole car.
Next, you’ll want to wait a few seconds and then begin your wipe off. The time to wait can vary based on your humidity, the higher the humidity, the faster you’ll want to begin wiping. It's worth noting that the bond between the coating and your paint takes place in the first 3-5 seconds, after that, it's all about picking a time that makes the leftover solvent carriers easy to remove. Too little time and it’ll be wet and will streak easily, too much time and it will become tacky and hard to buff. I found that waiting about 5 seconds produced great results for me in slightly above 60% humidity. I also recommend using a hile pile microfiber, as it absorbs the solvents very well and left me with no streaking.
 This is what Pure looks like right before its ready to be buffed off, its incredibly easy to see and you should have no problem missing any spots when removing.
Once you’ve completed buffing that specific section, take either a penlight or your phone’s flashlight and inspect the area you’ve just buffed for any high spots or streaks. Remove any spots that you see before moving on to the next section. These areas will be very easy to see, and will look similar to hologramming. Now that any high spots are removed, you’re ready to move on and repeat this process for the next part of your panel and the rest of the car. Err on the side of overlapping when coating the next part of your panel. Don’t worry about getting your invisible line on the car perfect, you just want to be sure that you didn’t miss anything and putting more coating on top of the section you just coated won’t hurt anything.
This is what Pure looks like right before its ready to be buffed off, its incredibly easy to see and you should have no problem missing any spots when removing.
Once you’ve completed buffing that specific section, take either a penlight or your phone’s flashlight and inspect the area you’ve just buffed for any high spots or streaks. Remove any spots that you see before moving on to the next section. These areas will be very easy to see, and will look similar to hologramming. Now that any high spots are removed, you’re ready to move on and repeat this process for the next part of your panel and the rest of the car. Err on the side of overlapping when coating the next part of your panel. Don’t worry about getting your invisible line on the car perfect, you just want to be sure that you didn’t miss anything and putting more coating on top of the section you just coated won’t hurt anything.
 Pure after being buffed off. As you can see, we have a perfect, deep finish, with no visible coating streaks or high spots.
When you’ve finished coating the car, give it a once-over with your flashlight to check for any high spots you may have missed. If you do see one, you’ll most likely need to hand polish that area and re-apply, as the coating will have set. Lastly, you can choose to apply Gyeon Cure on top of the coating to help Pure cure without disturbance from the outside world and to prevent water spotting during the curing time. You can apply Cure 1 hour after you’ve finished coating your last panel. Cure should be sprayed (1-2 sprays per 2x2 section should do) directly into a clean microfiber towel and buffed into the paint. It will create an incredibly slick feel on the surface and you’ll know if you missed any areas.
At this point, if you have a garage, I’d recommend leaving it inside for 24 hours to give the initial drying phase some time to occur without any outside influence. If not, don’t worry, you the car will be fine outside, but if possible, avoid driving it for a little while. Keep in mind that you should consider the weather if you don’t have a garage. Don’t apply the product on a Monday evening if you know it’s going to rain on Tuesday, etc, etc.
Pure after being buffed off. As you can see, we have a perfect, deep finish, with no visible coating streaks or high spots.
When you’ve finished coating the car, give it a once-over with your flashlight to check for any high spots you may have missed. If you do see one, you’ll most likely need to hand polish that area and re-apply, as the coating will have set. Lastly, you can choose to apply Gyeon Cure on top of the coating to help Pure cure without disturbance from the outside world and to prevent water spotting during the curing time. You can apply Cure 1 hour after you’ve finished coating your last panel. Cure should be sprayed (1-2 sprays per 2x2 section should do) directly into a clean microfiber towel and buffed into the paint. It will create an incredibly slick feel on the surface and you’ll know if you missed any areas.
At this point, if you have a garage, I’d recommend leaving it inside for 24 hours to give the initial drying phase some time to occur without any outside influence. If not, don’t worry, you the car will be fine outside, but if possible, avoid driving it for a little while. Keep in mind that you should consider the weather if you don’t have a garage. Don’t apply the product on a Monday evening if you know it’s going to rain on Tuesday, etc, etc.
Application
Moving on to the application, we’ll first touch on prep. While I won’t be going fully over prep in this guide, I do want to stress how important it is that the surface is bare and clean of any oils or sealants before coating the car. If your car is already swirl-free and you feel confident that the paint you have is the paint you’re ready to lock in with this coating, I would still recommend that you go over the car with a finishing polish (I like Sonax Perfect Finish) to remove whatever your current LSP is. Whether it’s a Polymer sealant like Sonax Polymer NetShield, or a ceramic spray coating like HydroSilex Recharge or Gyeon CanCoat, you’ll need it to be removed. After that finishing polish, you’ll want to wipe down with either Gyeon Prep or IPA. I recommend doing a full car wipe down, and then going over it quickly a second time to ensure nothing was missed. If you are fully correcting your car before coating, nothing changes in terms of the final steps I’ve mentioned here, just be sure to get that paint clean and bare! Once the paint is bare and ready to be coated, we can get our gloves on, our coating bottles out, and begin the process. Pure is not a coating that can be applied one whole panel at a time, you’re going to want to section things out. I did the hood of the M240 in 4 sections, the doors in 3, and most other parts of the car in 2-3 sections. Use your common sense here, something like a trunk is small enough to do in 2 sections, but a rear bumper should be broken into 3 or 4 depending on size. To begin, place 4 or 5 drops on the top of your applicator, enough to make a dot about the size of a quarter. I’ve used the included foam block with microfiber suede. Once you have your dot, start at on your chosen panel making either an up and down or a left to right motion, you don't need to lift the application in between passes. You do not need to crosshatch this coating. Once you’ve covered your desired area, wait 5-10 seconds and then go back and make circular motions using the applicator in the area you just covered, following the same up and down or left and right motion. This method was outlined by Jeff from Gyeon in this Detailed Image guide, and it makes install a breeze. Click through to see Jeff’s method in further detail. Showing the motion you should be making when applying. Up and down OR left and right, but not both. We can just pretend I was wearing gloves in this photo. I was being admittedly lazy since I was only coating my trunk and not the whole car. This is what Pure looks like right before its ready to be buffed off, its incredibly easy to see and you should have no problem missing any spots when removing. Pure after being buffed off. As you can see, we have a perfect, deep finish, with no visible coating streaks or high spots.